Local Storage seems to be disabled in your browser.
For the best experience on our site, be sure to turn on Local Storage in your browser.
Create a Countdown Calendar
Create a Countdown Calendar
Count the sleeps till a holiday, vacation, special birthday or some other event with this fun and rewarding DIY countdown calendar!
Make it easier to count the days till your next holiday or event by making this fun and easy countdown calendar. Inside each bag you can include a treat plus a coordinating “letter card” that you can pin up in place of each bag as you count the days. The end result is a bunting that spells out a secret message like “Bon Voyage”, “Happy Birthday”, or “Congratulations”. The best part about making it yourself is that you can fill it with whatever you’d like, whether that’s candy, sachets of tea or something else.
For this example, let’s say we’re counting down to a Valentine’s Day getaway in the tropics (we can dream, right?). We’ll start our countdown at 10 days till take off, so we’re going to need 10 numbered countdown bags. Here’s how to make it happen:
What You’ll Need
How to Make a DIY Countdown Calendar:
1. Start by visiting our gallery to select the template design you’d like to use for your labels and cards. Our designs can be used across a variety of different label shapes and sizes, as well as cards. So, you’ll be able to easily coordinate your number labels with the message cards inside. We’ve chosen the Valentine Anchor template, since it works perfectly with our Valentine’s Day getaway.
2. We’ll make the message cards first. Since we’re counting down to a vacation we’re going with Bon Voyage as the secret message. To make these cards we’re using Avery Notecards and creating four single-sided cards from one sheet. To do this, we’ll apply the same design to the front and the back of the cards.
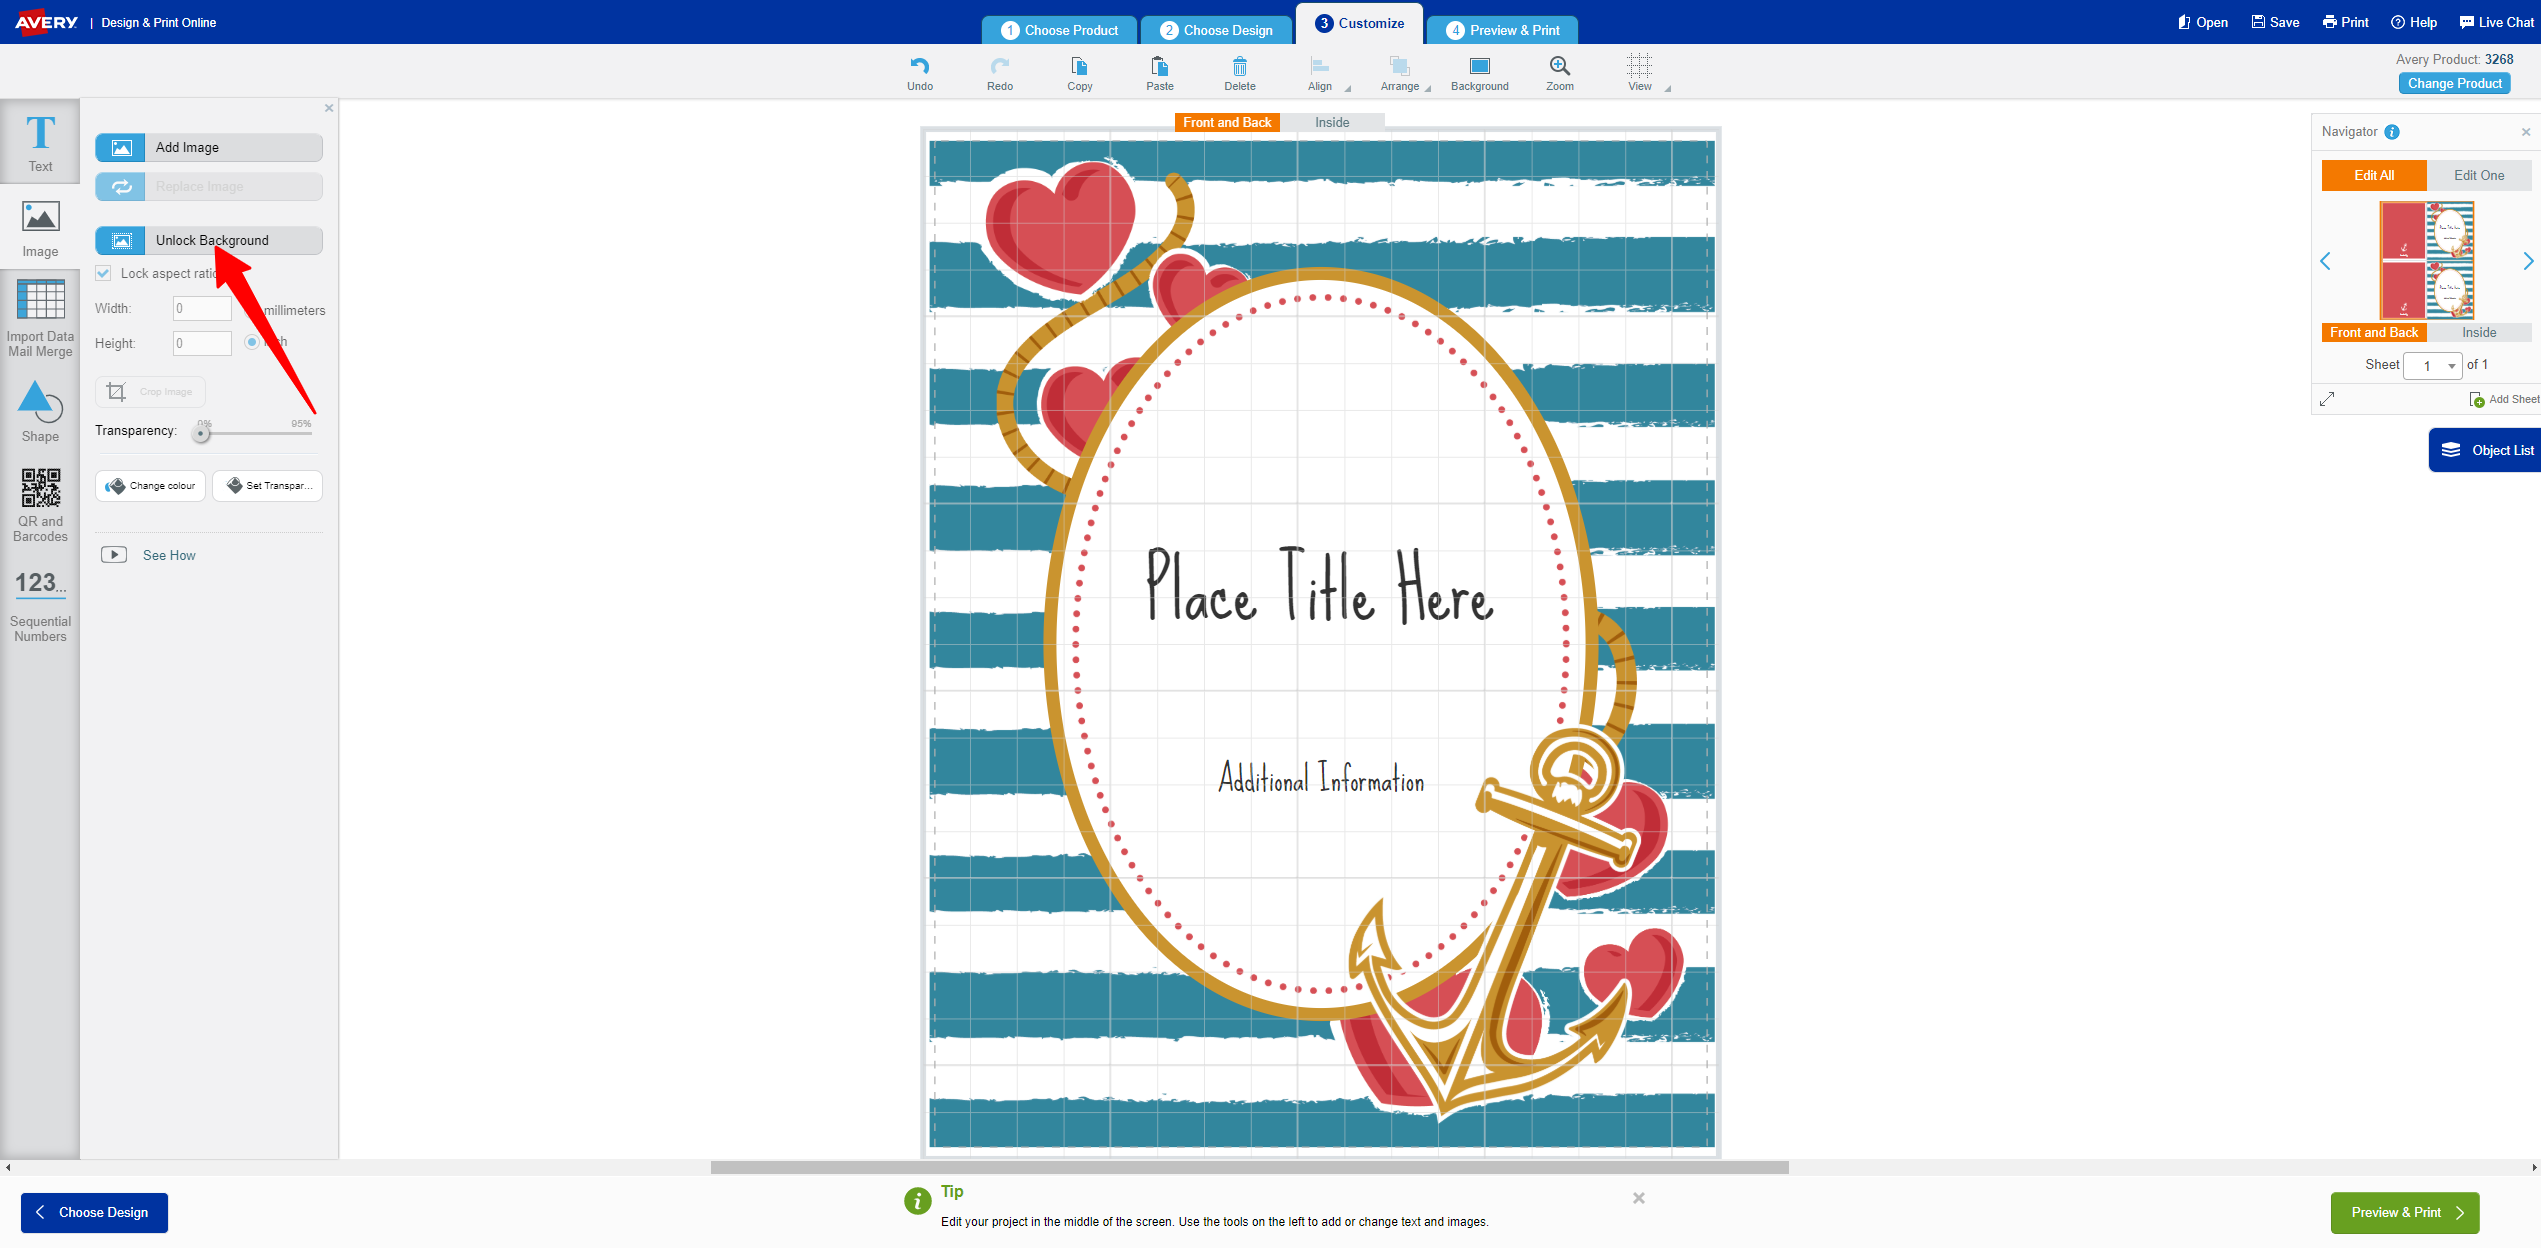
3. Applying the cover art to the back of your card is easy! Simply click on the card’s background, then select “Unlock Background” from the image menu to the right of the editor. This will shrink the background and make it selectable. Once your background has reduced in size, click and drag from the top left corner down to the bottom right –selecting all images in the canvas. Then right click to copy.
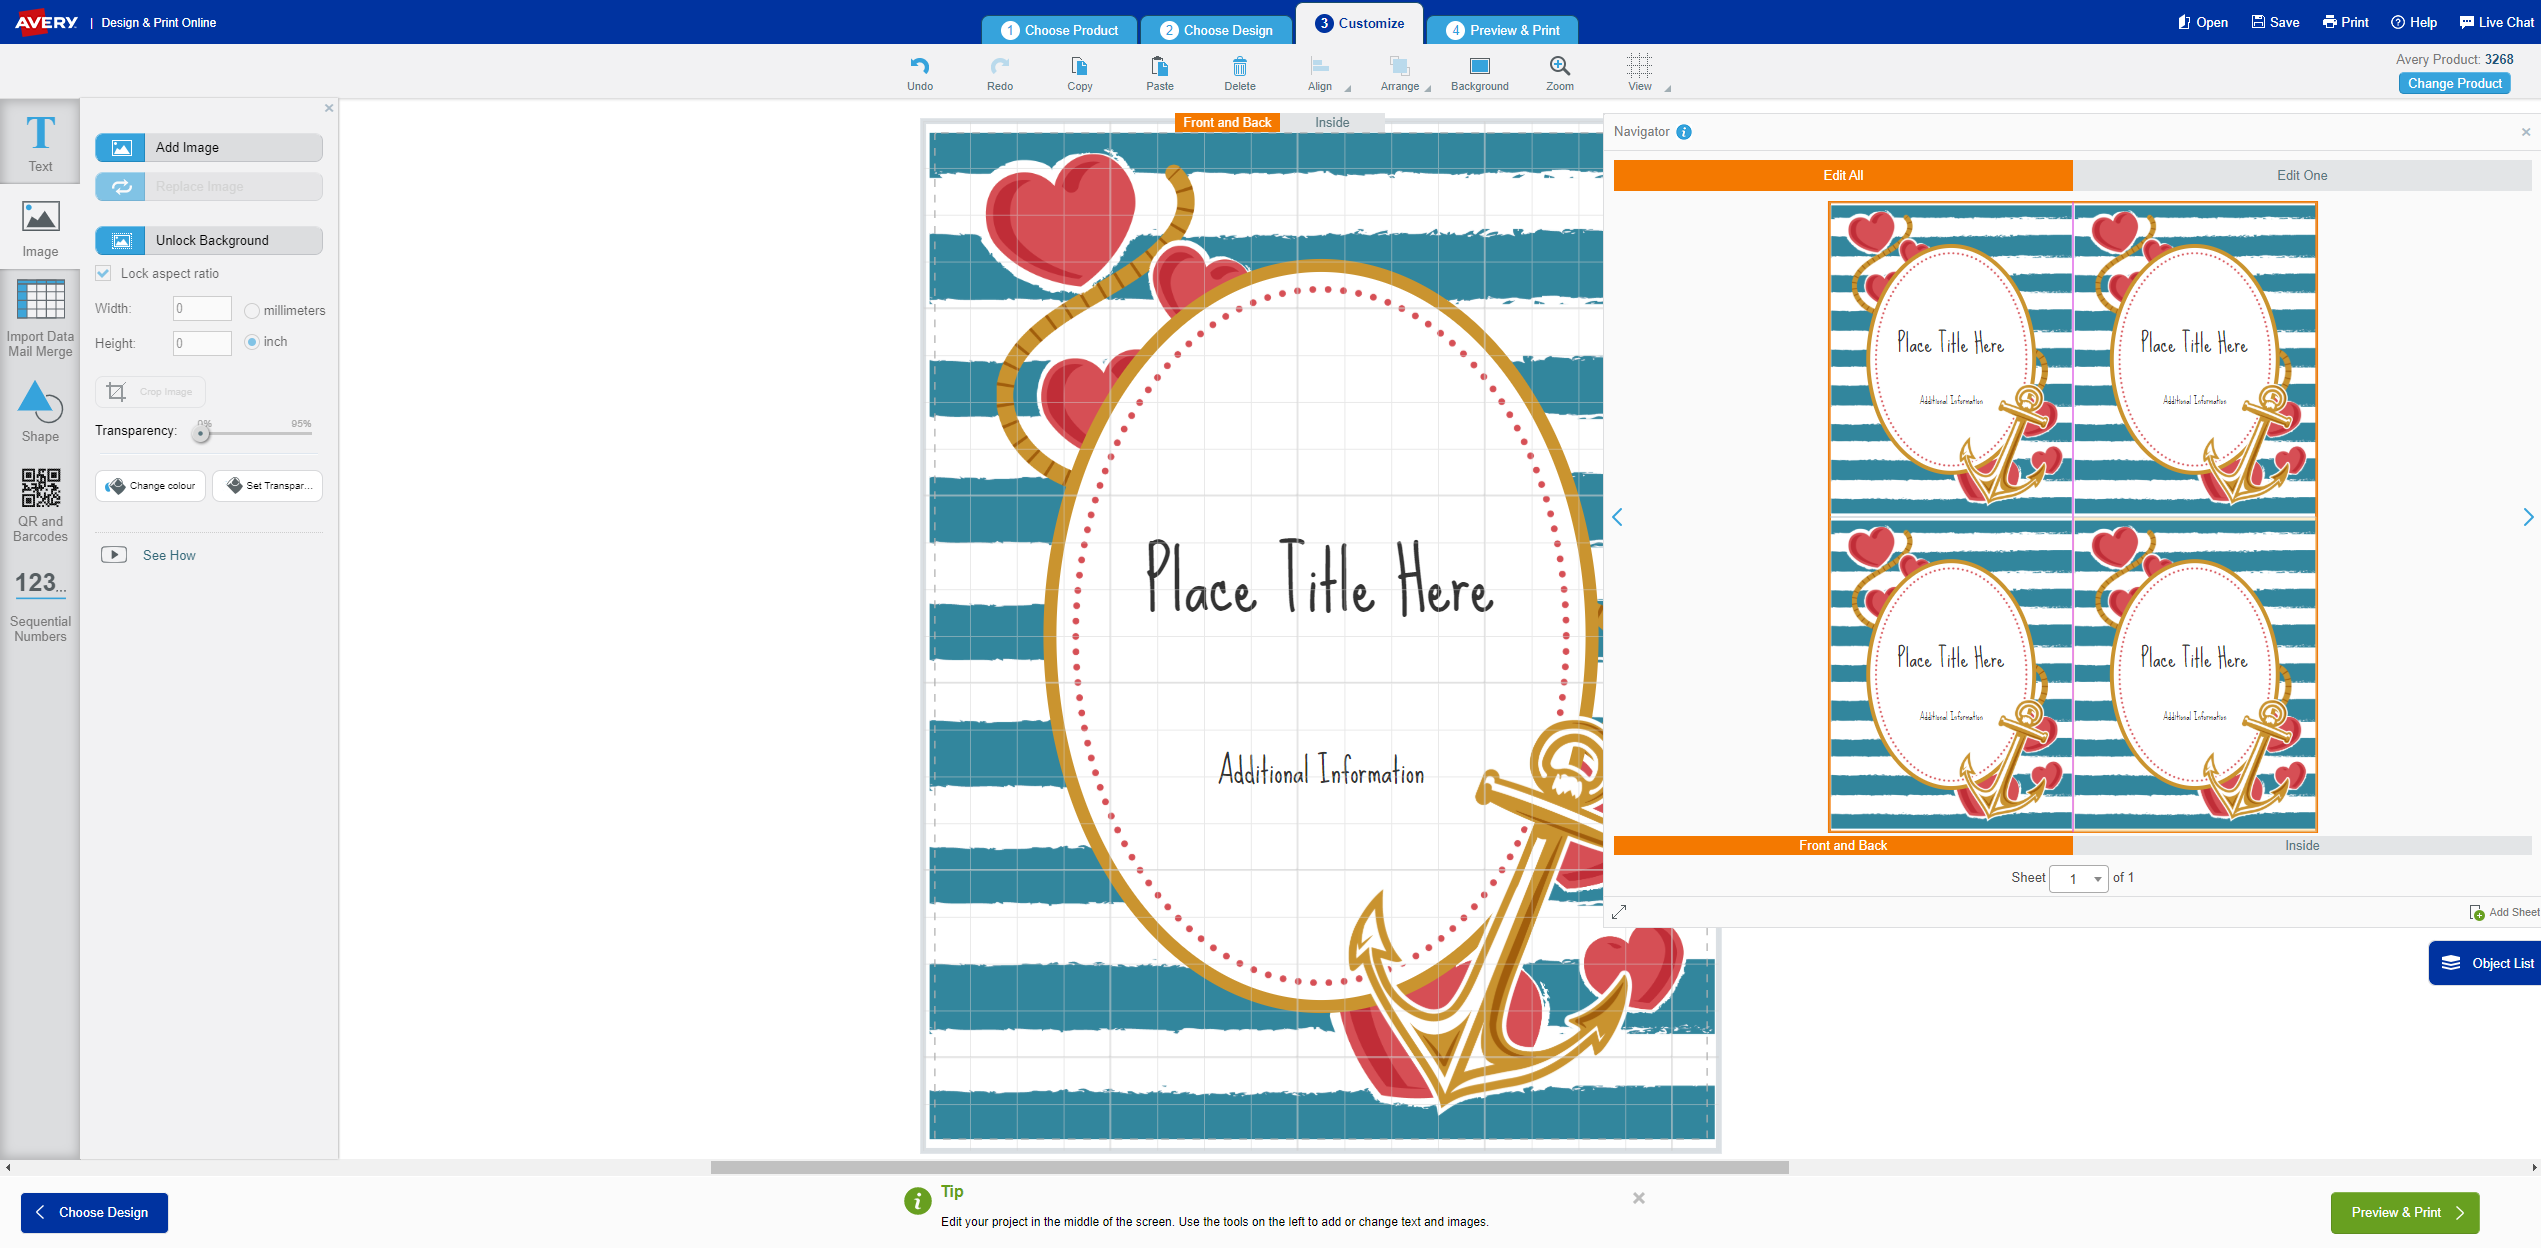
4. In the Navigator Box at the top right corner, select the back of your card. Paste the cover art here. Then, click the background image and select “Set as Background” from the Image menu on the left side. This will allow you to create 4 single-sided cards.
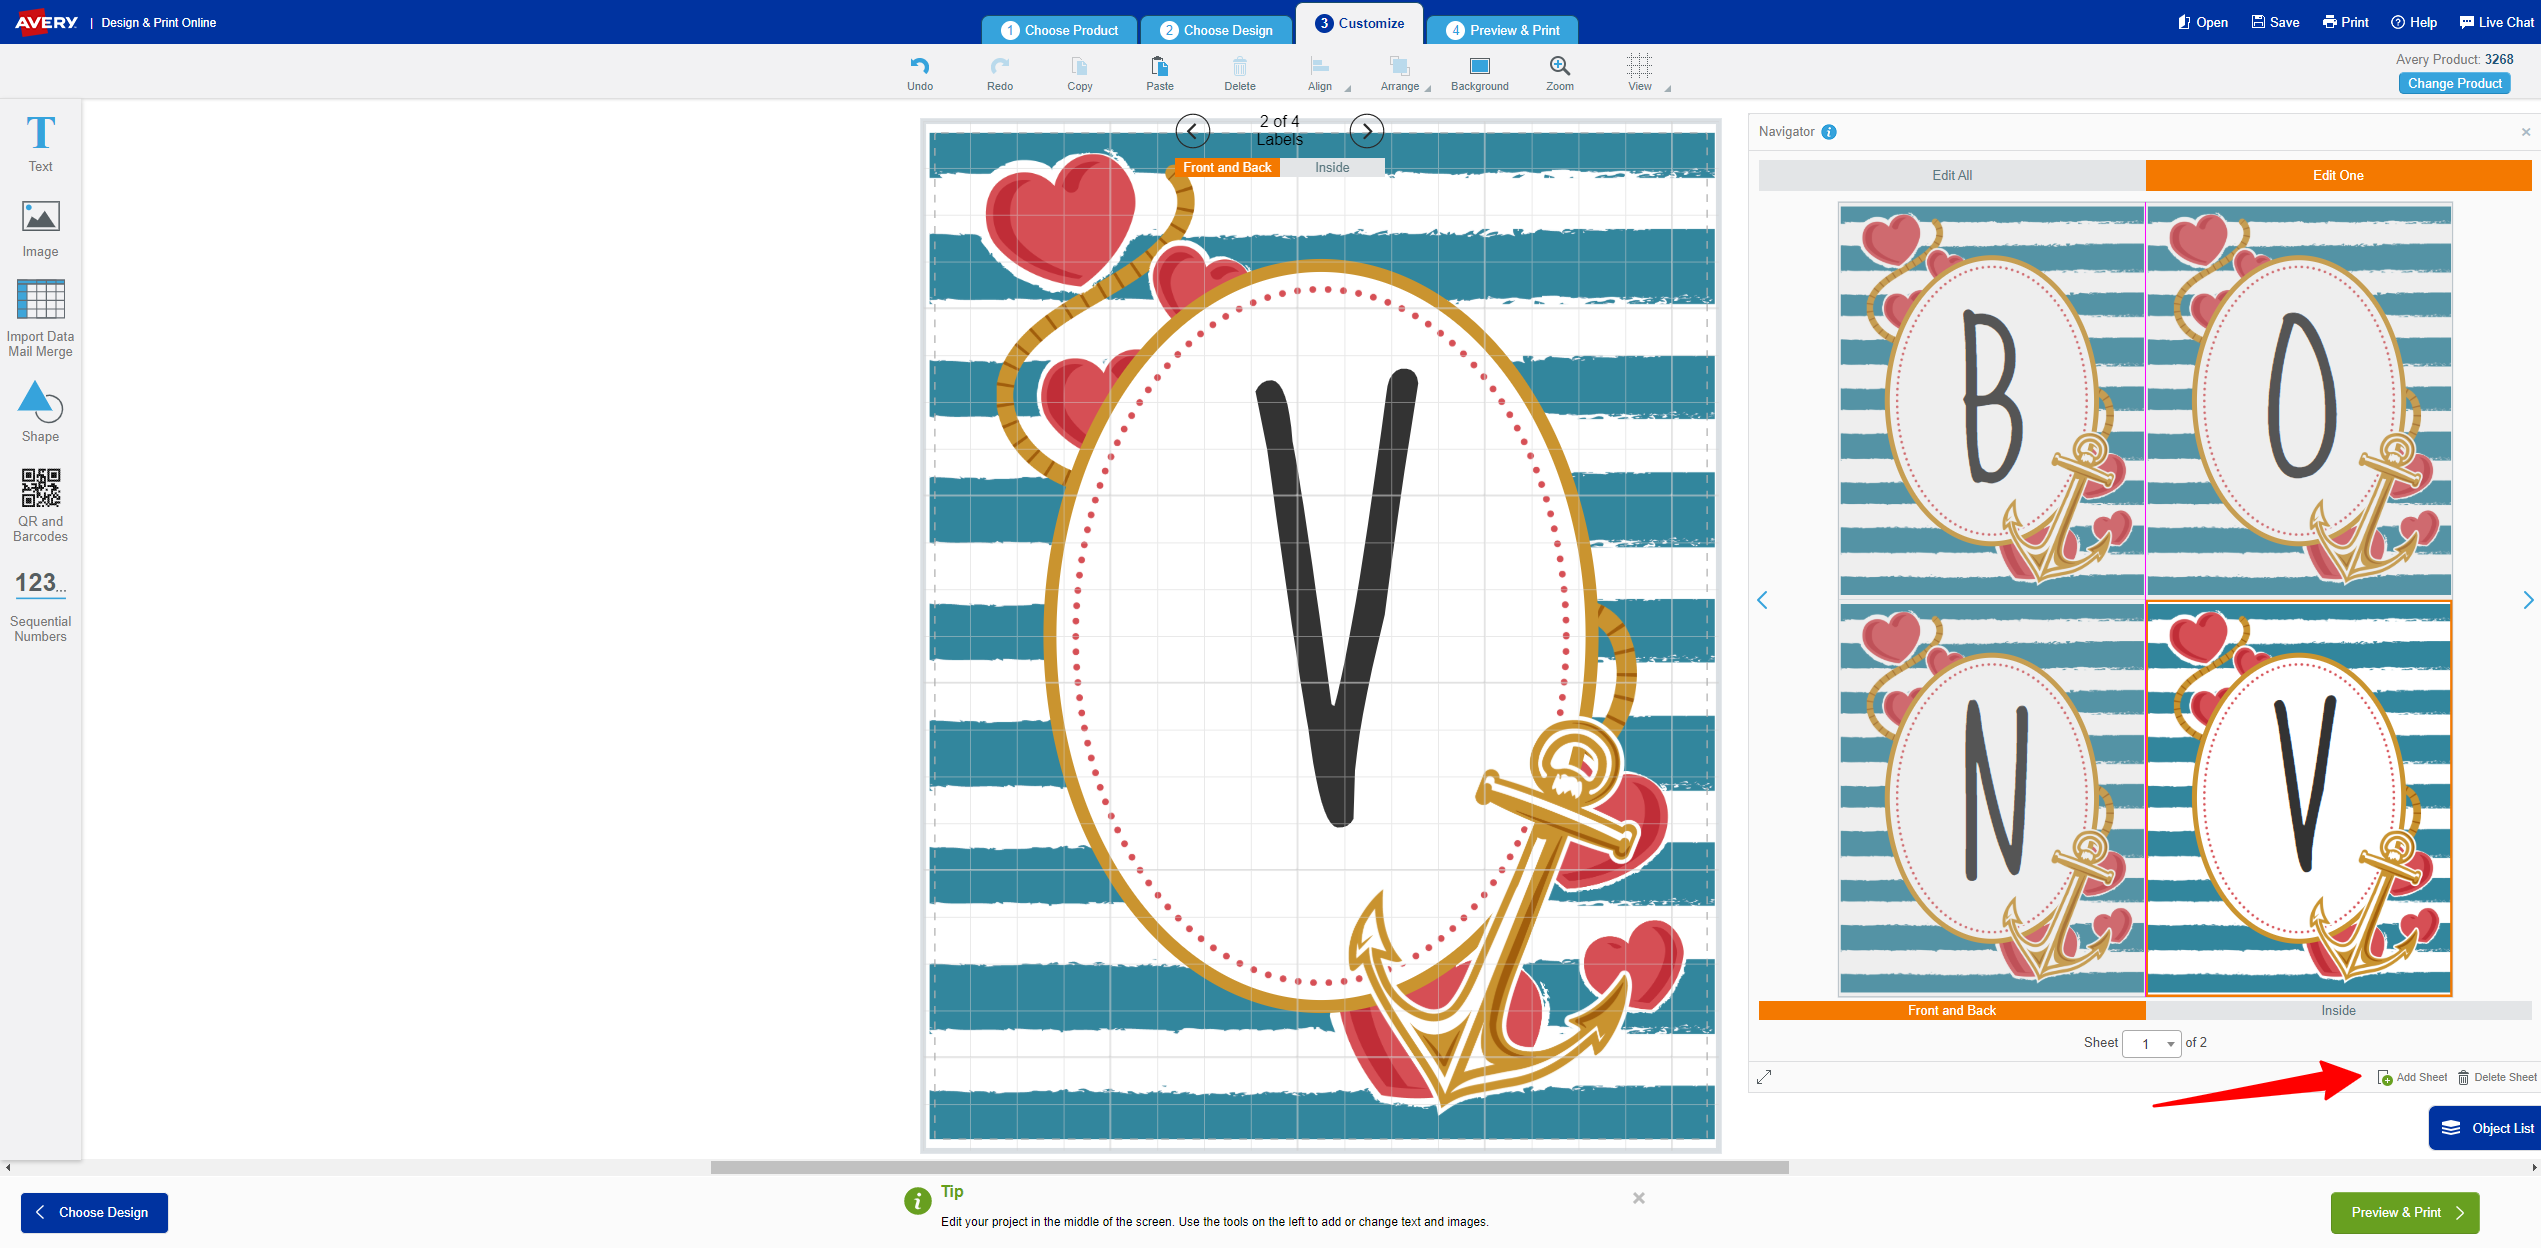
5. Once you have you four set up, simply click Edit One from the Navigator menu to add your letters for the message. To create additional sheets, click Add Sheets from the bottom of the Navigator box. NOTE: If your message doesn’t have enough words to equal the number of days you’ll be counting down, you can add images to the centre of each card as a spacer or embellishment.
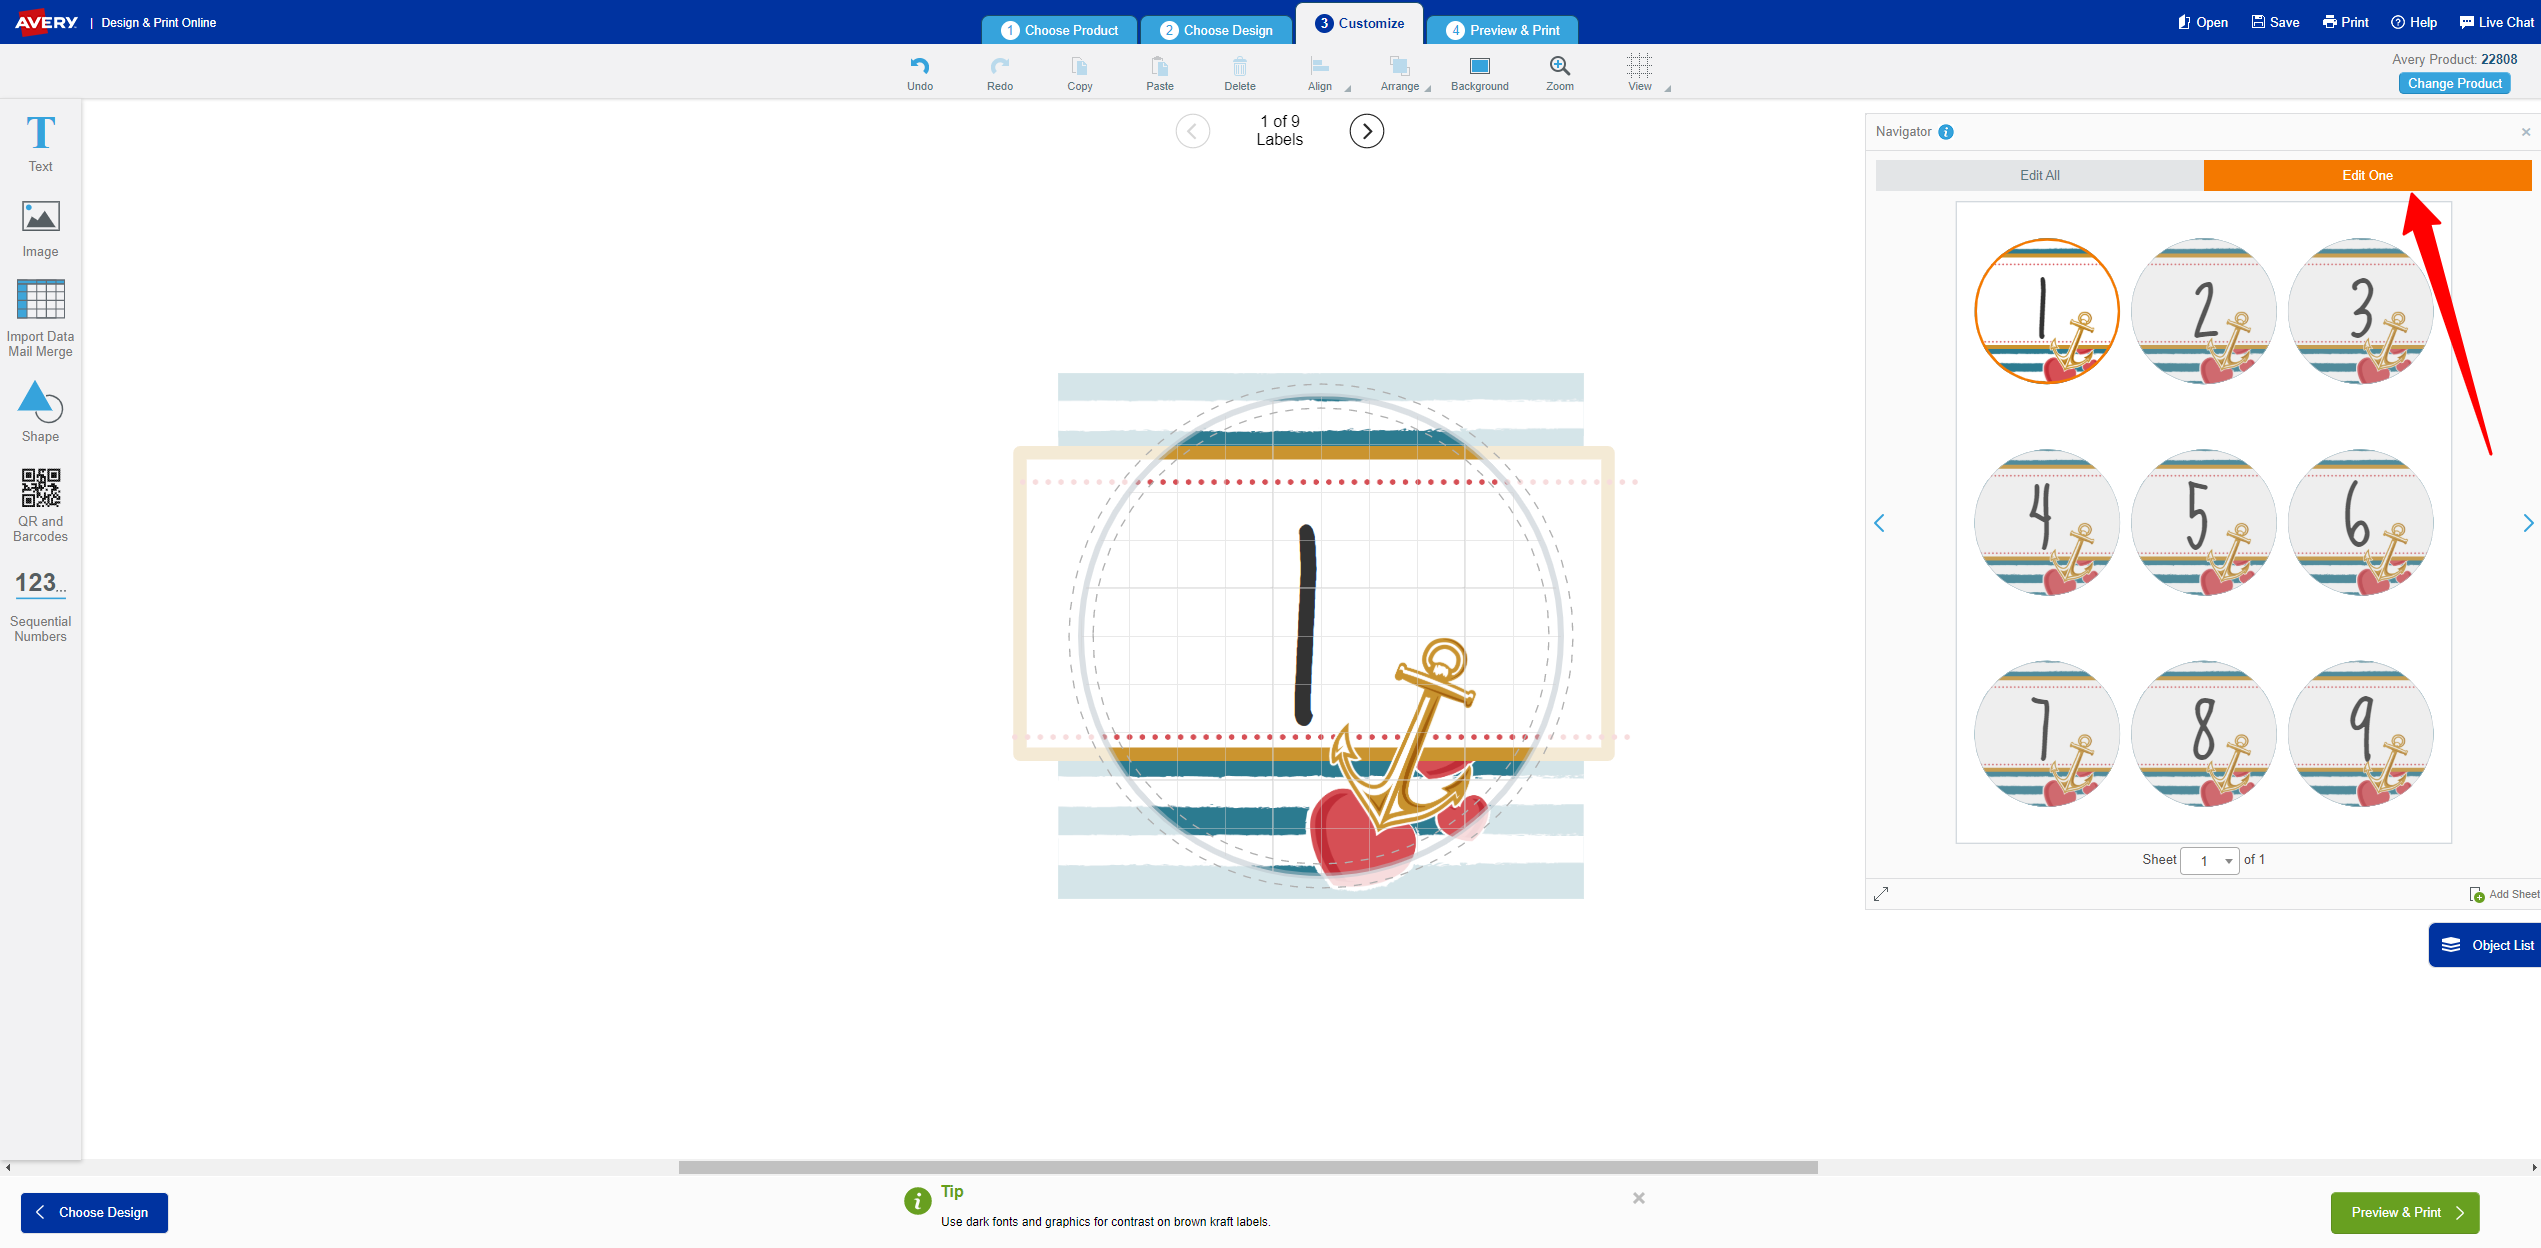
6. Once you’ve completed your cards, it’s time to make the number labels for the outside of each bag. First, select your template, then hit Edit One from the Navigator box on the left to individually edit the text on each label.
7. Next, print your labels, fill your bags with a treat and your secret message cards. Then, apply a label to each bag.
8. If you plan to hang your calendar, attach the bags to some twine with clothespins! Don't want to hang the calendar? You can just place the bags in a decorative box or basket. After that, all that’s left is to start counting down to your big day!

If you make this DIY Countdown Calendar, be sure to share the finished results with us on social media using hashtag #MadeWithAveryCanada!
Get inspired! Let Avery.ca help you create, organize, plan, and get down to business with innovative ideas, hundreds of free templates, a wide selection of products and high-quality printing services.

Recent Posts
Month
- April 2024
- March 2024
- February 2024
- January 2024
- December 2023
- November 2023
- October 2023
- September 2023
- August 2023
- July 2023
- June 2023
- May 2023
- April 2023
- March 2023
- February 2023
- January 2023
- December 2022
- October 2022
- September 2022
- August 2022
- July 2022
- June 2022
- May 2022
- April 2022
- March 2022
- February 2022
- January 2022
- December 2021
- November 2021
- October 2021
- September 2021
- August 2021
- July 2021
- June 2021
- March 2021
- February 2021
- January 2021
- December 2020
- November 2020
- October 2020
- September 2020
- August 2020
- July 2020
- June 2020
- May 2020
- April 2020
- March 2020
- February 2020
- January 2020
- October 2019
- September 2019
- August 2018
- March 2018
- February 2018
- November 2017
- October 2017
- March 2017
- February 2017
- January 2017
- December 2016
- October 2016
- September 2016
- August 2016
- July 2016
- June 2016
- May 2016
- April 2016
- January 2016
- November 2015
- October 2015
- September 2015
- May 2015
- April 2015
- March 2015
- February 2015
- December 2014
- October 2014
- September 2014
- July 2014
- May 2014
- April 2014
- February 2014
- December 2013
- June 2013
- February 2013