Keep closets organized, whether by size, season, or something else, with this quick and easy to DIY closet divider project.
 Upcycle your family’s cereal boxes while also organizing their closets, with this fun and easy DIY closet divider project. All you need are empty cereal boxes, a pack of Avery CD Labels and some basic crafting tools.
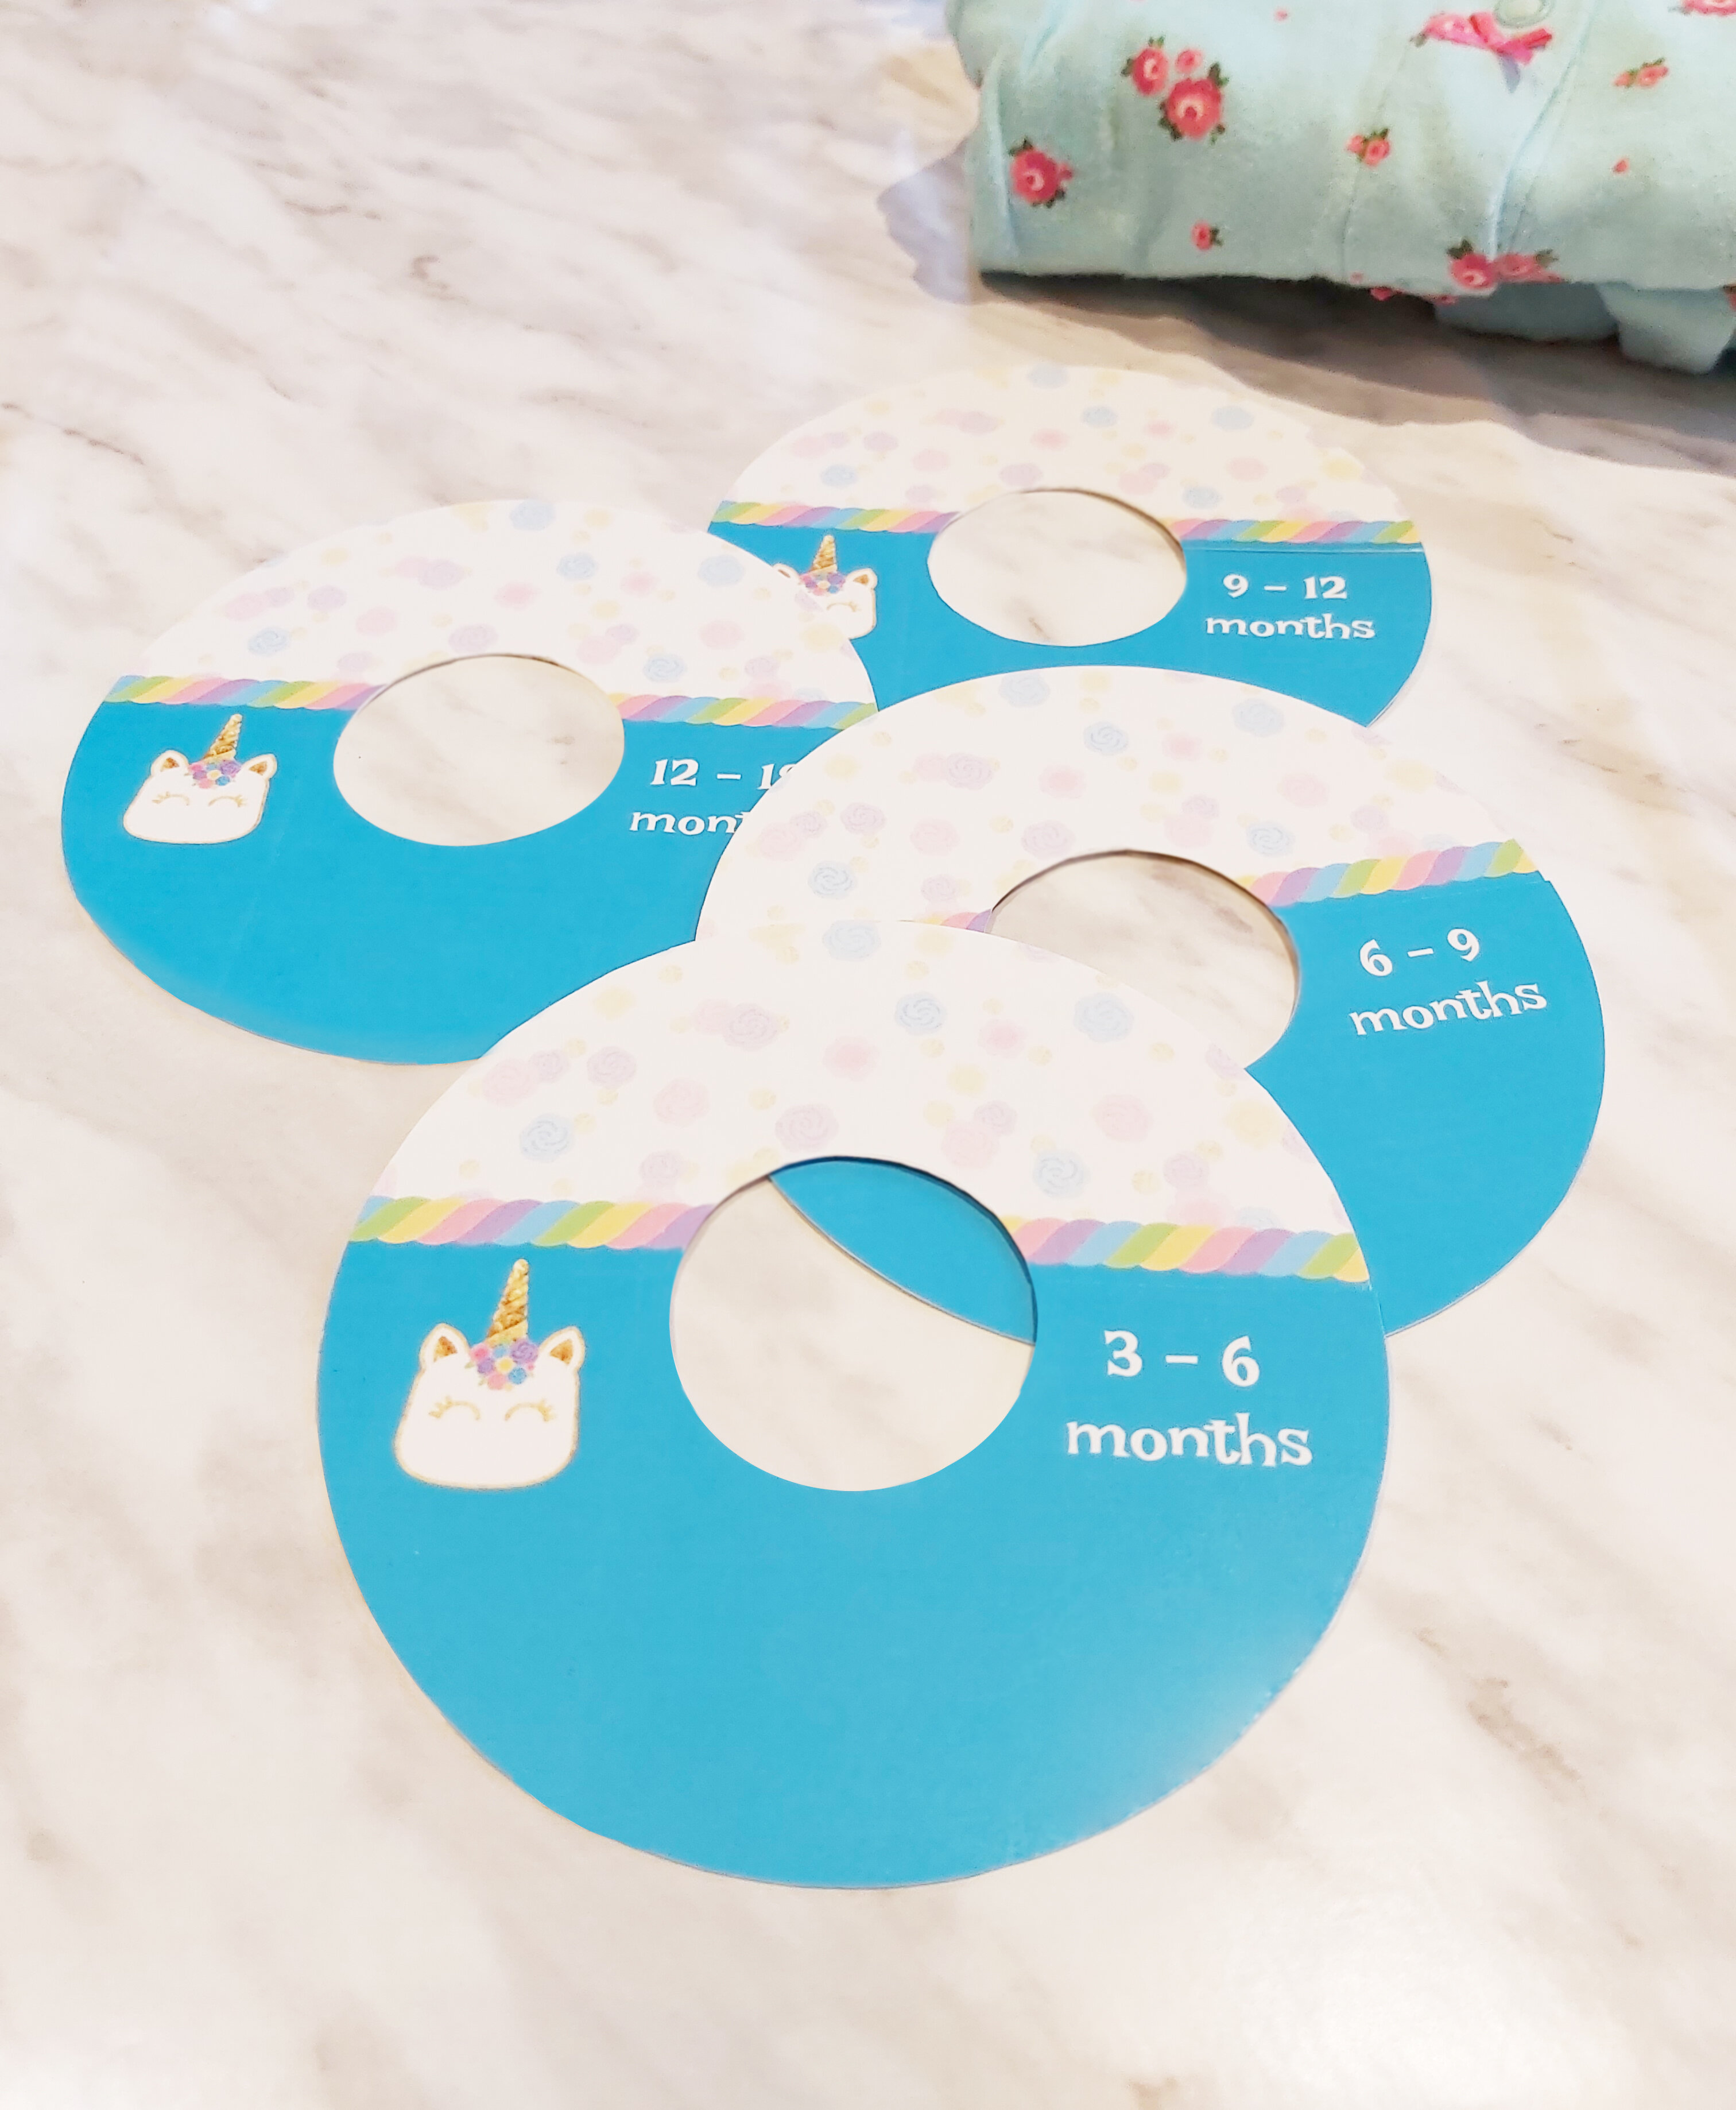
Looking for DIY baby shower gift ideas? Not only is the project great for separating seasonal clothes in your own closet, but you can make them into charming baby closet dividers. Baby closet dividers are a wonderful gift to present to new or expecting parent, since they almost always receive baby clothes in a variety of sizes!
Upcycle your family’s cereal boxes while also organizing their closets, with this fun and easy DIY closet divider project. All you need are empty cereal boxes, a pack of Avery CD Labels and some basic crafting tools.
Looking for DIY baby shower gift ideas? Not only is the project great for separating seasonal clothes in your own closet, but you can make them into charming baby closet dividers. Baby closet dividers are a wonderful gift to present to new or expecting parent, since they almost always receive baby clothes in a variety of sizes!
Avery CD Labels
Avery Templates
Empty Cereal Boxes (1 family size boxes will make 8 dividers) or 1 Sheet of Poster Board
An old CD
Craft Knife
Cutting Mat
 Ensure that the top and bottom flaps of your cereal boxes have been opened. Then, using your craft knife, carefully cut through one of the boxes side seams and then lay the whole box flat on of your cutting map.
1. With the blank side of your box facing up, use your old CD as a pattern and trace as many circles onto the cardboard as possible.
2. Using your craft knife, cut out each circle and set aside.
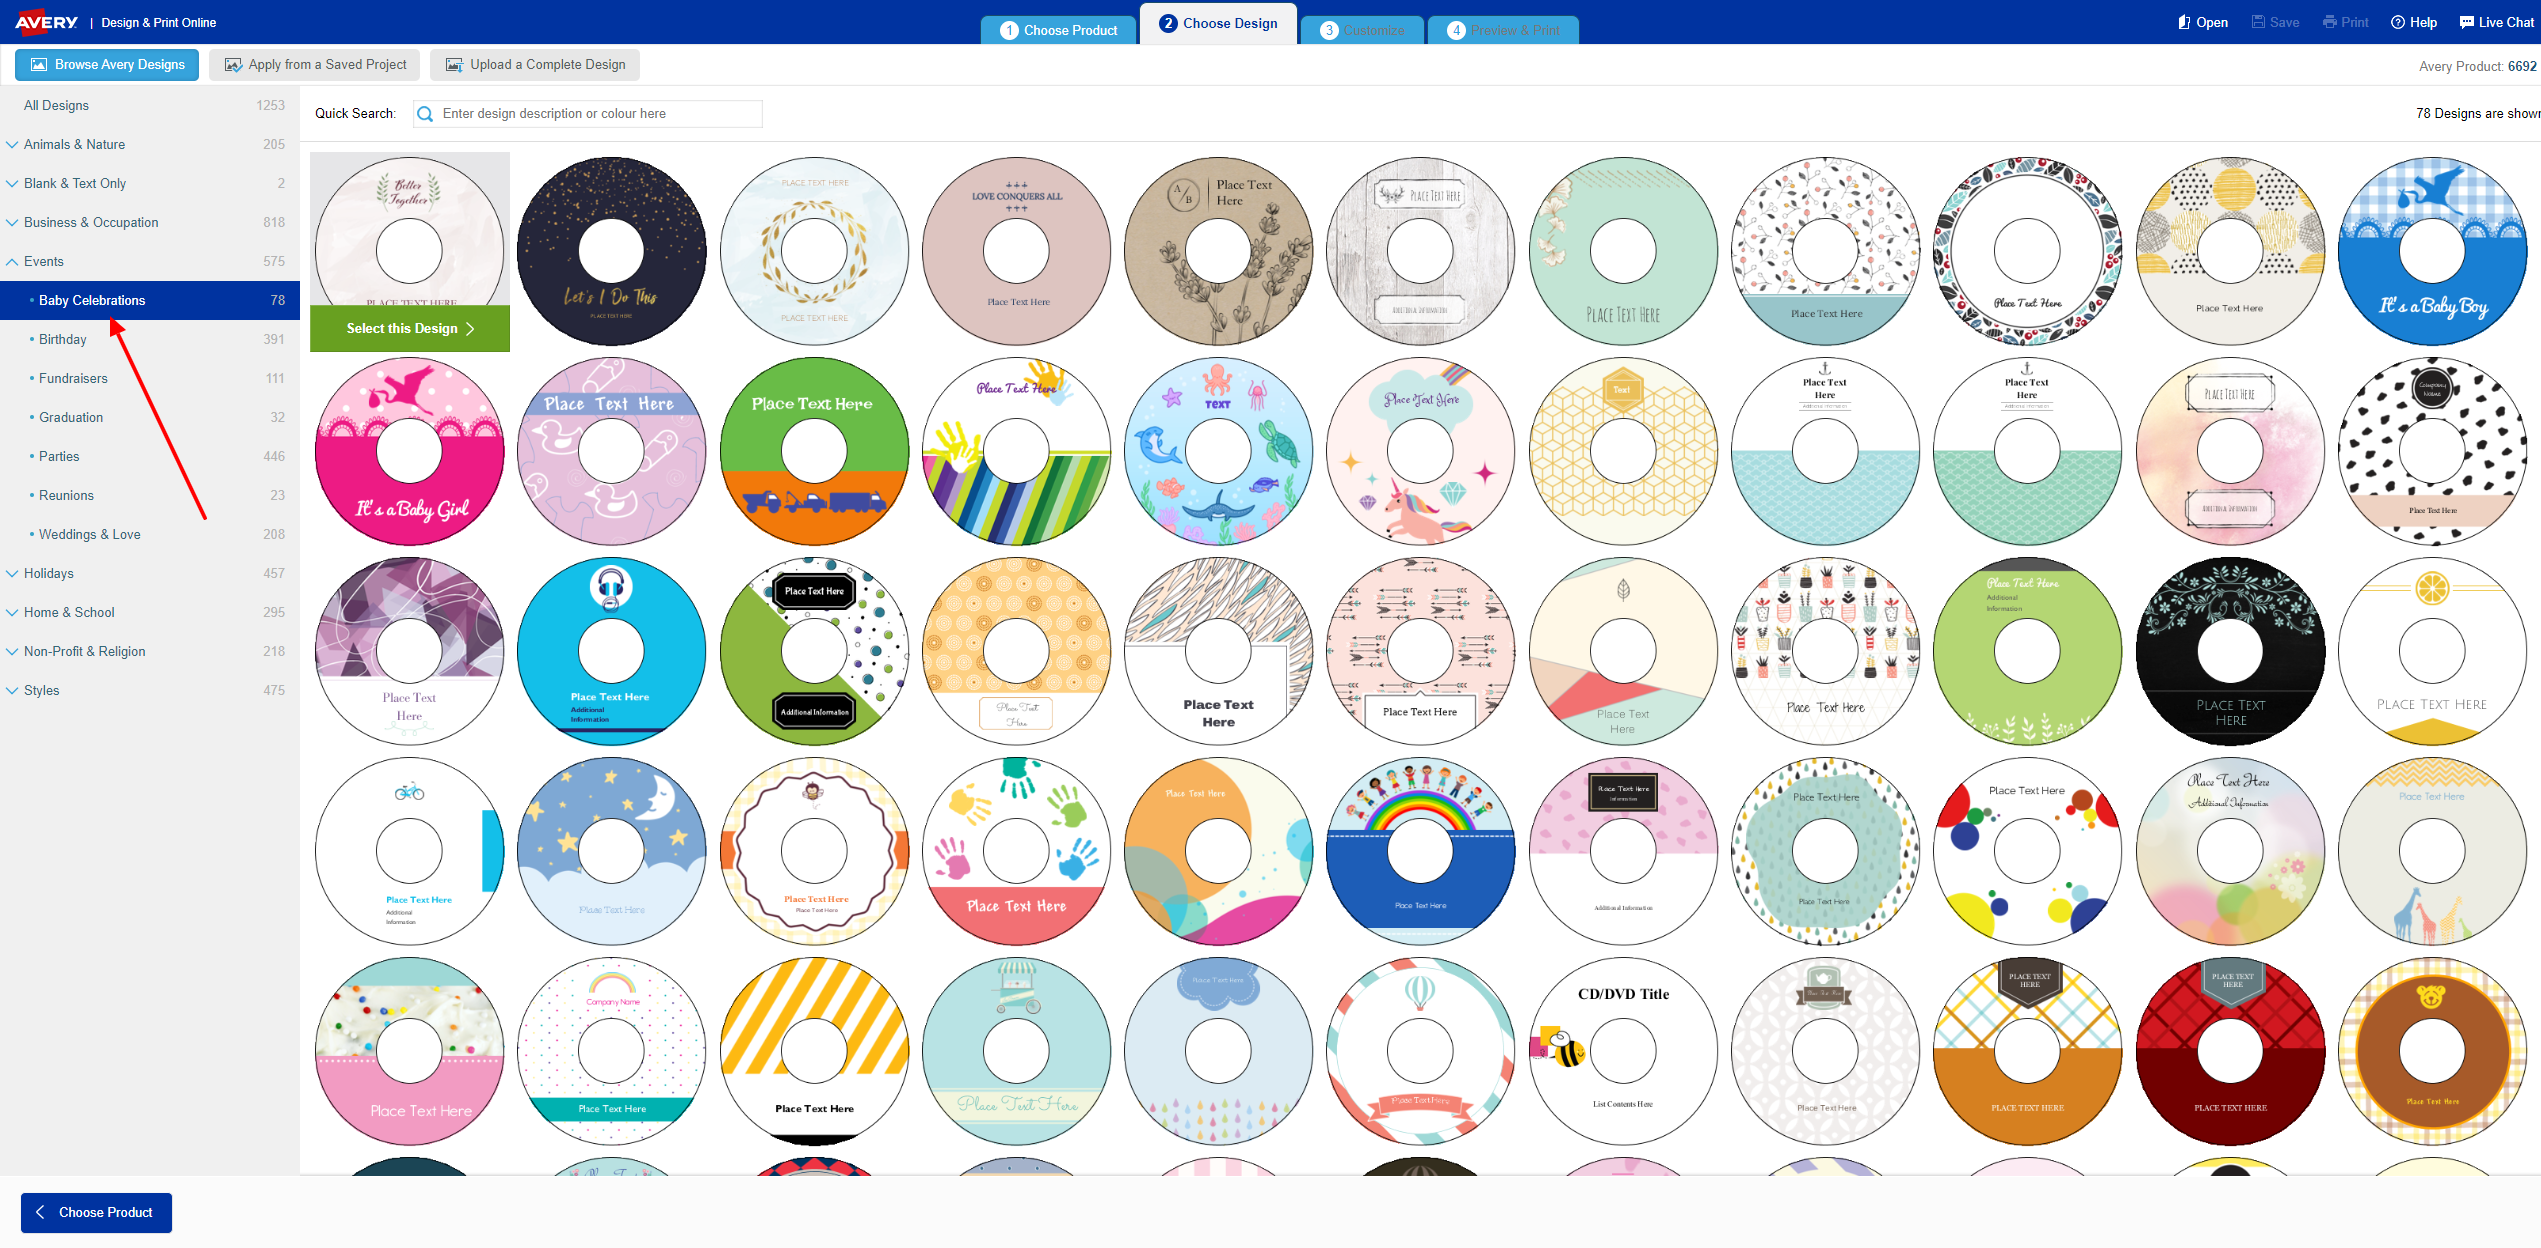
3. Go to the CD Labels page on Avery.ca and browse our library of CD label designs. If you’re making baby closet dividers, take a look through our Baby Celebrations templates! You can also upload your own design or create something from scratch using our blank template.
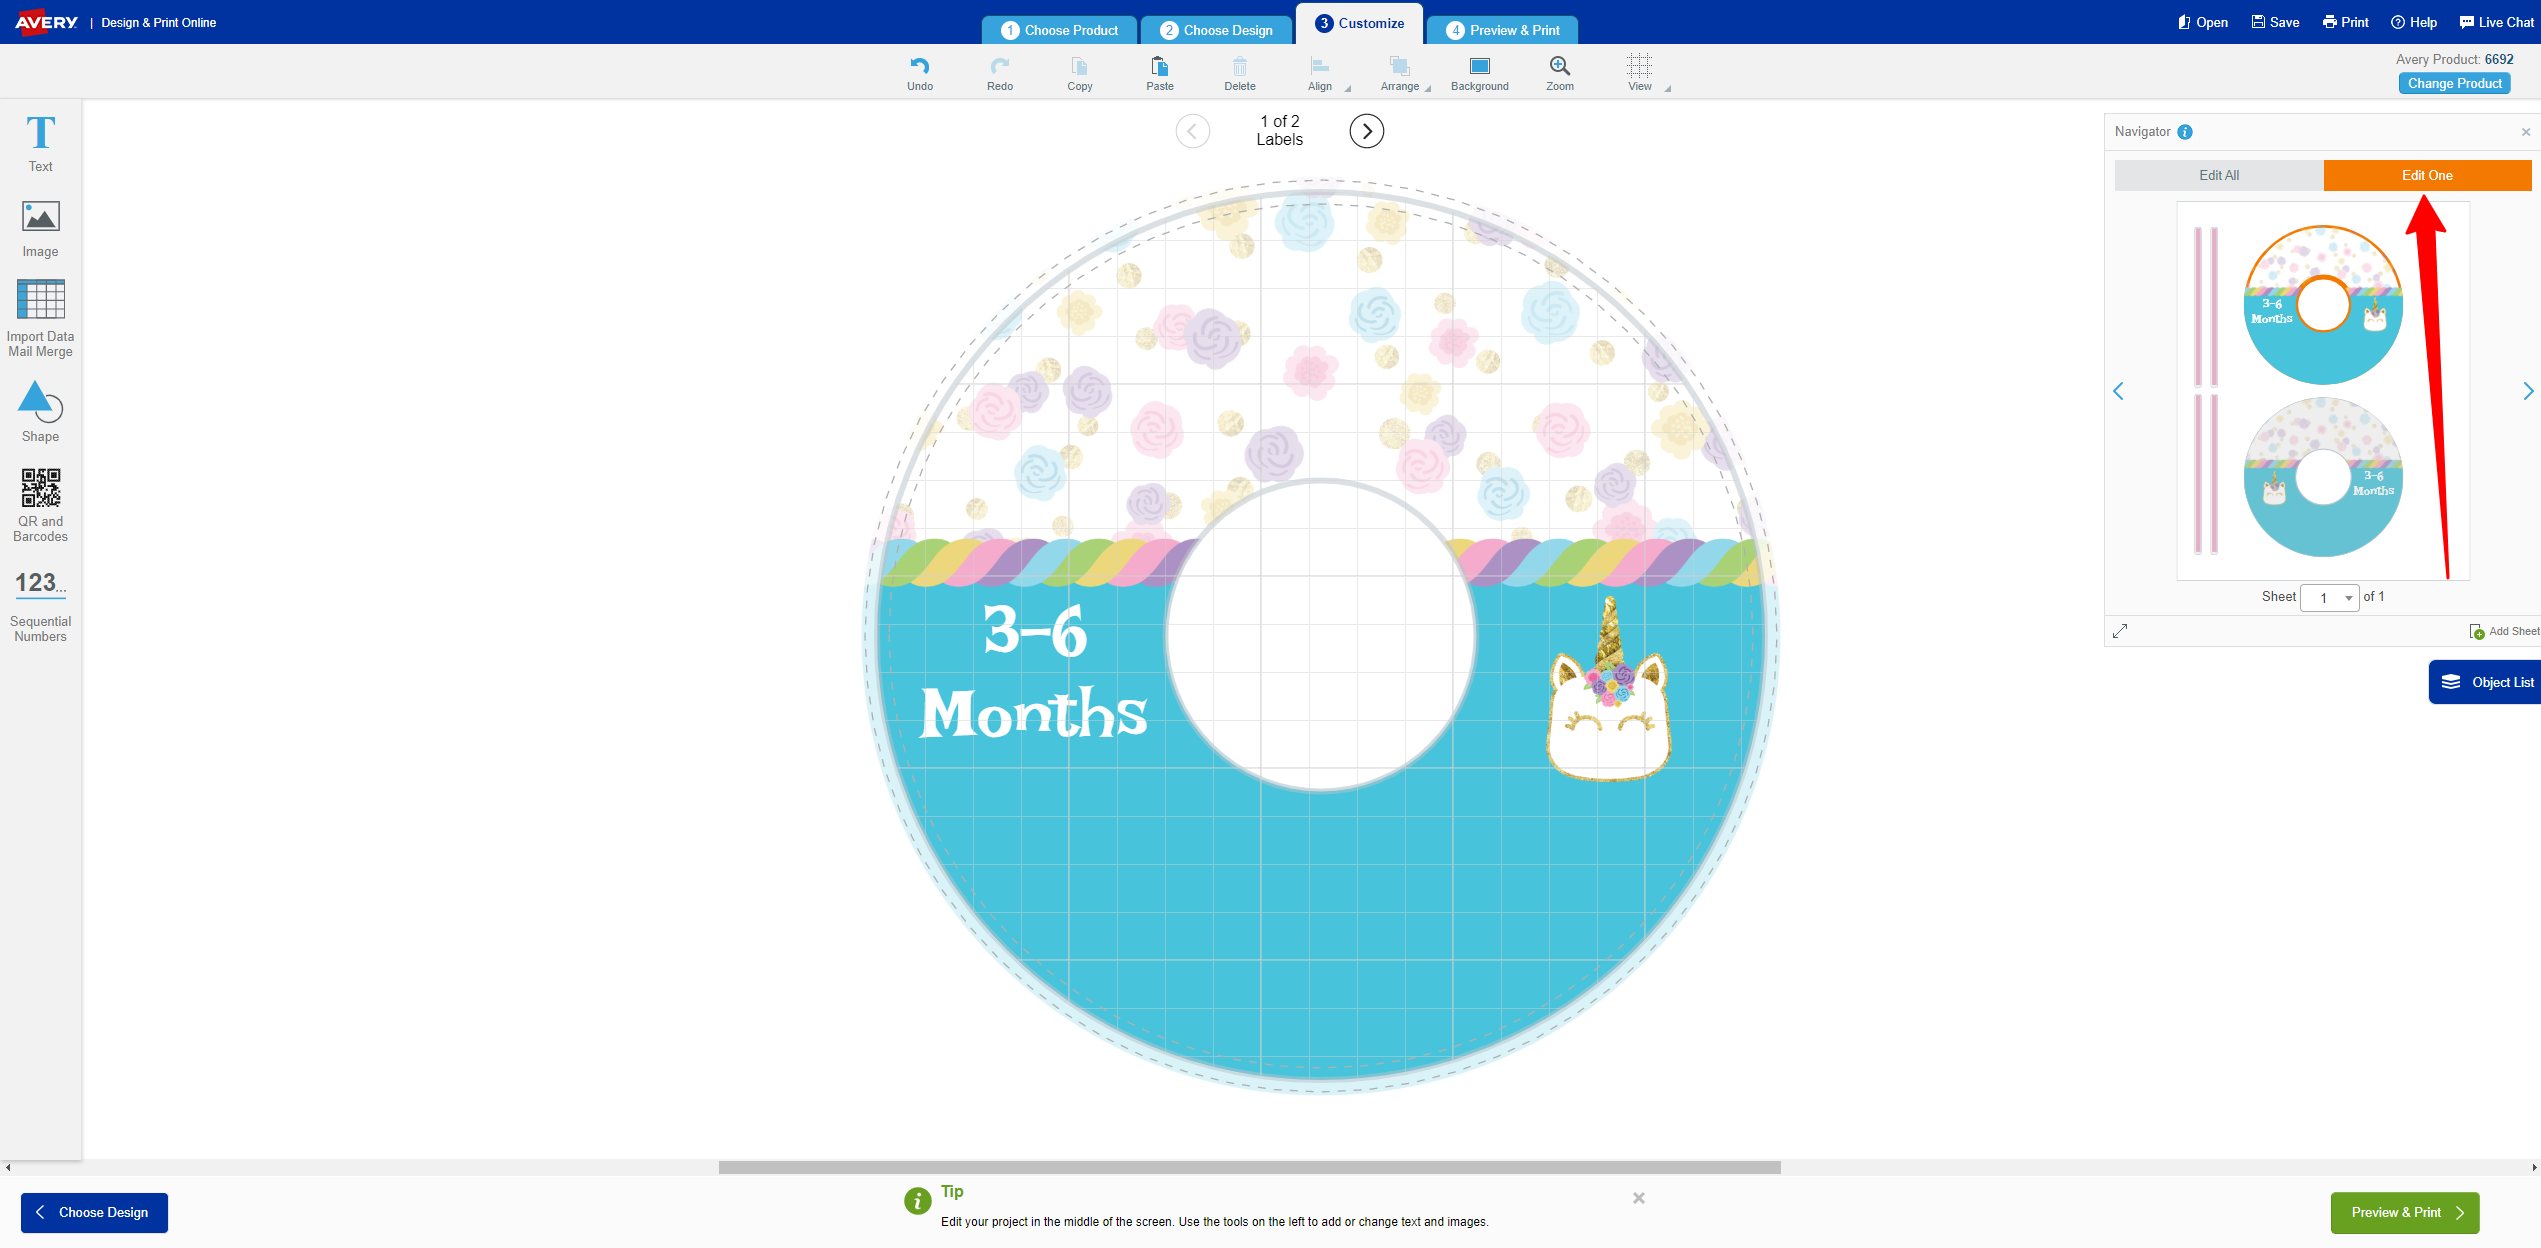
4. Once you’ve selected your desired template, it’s time to personalize each label with sizes, seasons, or whichever method you plan to use to divide your closet. Each sheet of two labels creates one double sided closet divider. To make the front and back designs identical, you’ll want to create a mirror image of one.
Ensure that the top and bottom flaps of your cereal boxes have been opened. Then, using your craft knife, carefully cut through one of the boxes side seams and then lay the whole box flat on of your cutting map.
1. With the blank side of your box facing up, use your old CD as a pattern and trace as many circles onto the cardboard as possible.
2. Using your craft knife, cut out each circle and set aside.
3. Go to the CD Labels page on Avery.ca and browse our library of CD label designs. If you’re making baby closet dividers, take a look through our Baby Celebrations templates! You can also upload your own design or create something from scratch using our blank template.
4. Once you’ve selected your desired template, it’s time to personalize each label with sizes, seasons, or whichever method you plan to use to divide your closet. Each sheet of two labels creates one double sided closet divider. To make the front and back designs identical, you’ll want to create a mirror image of one.
 5. To add different text to each label, select Edit One from the box on the right side of your screen. Then, click the label that you’d like to edit. When you’re finished, click on the other label on the sheet.
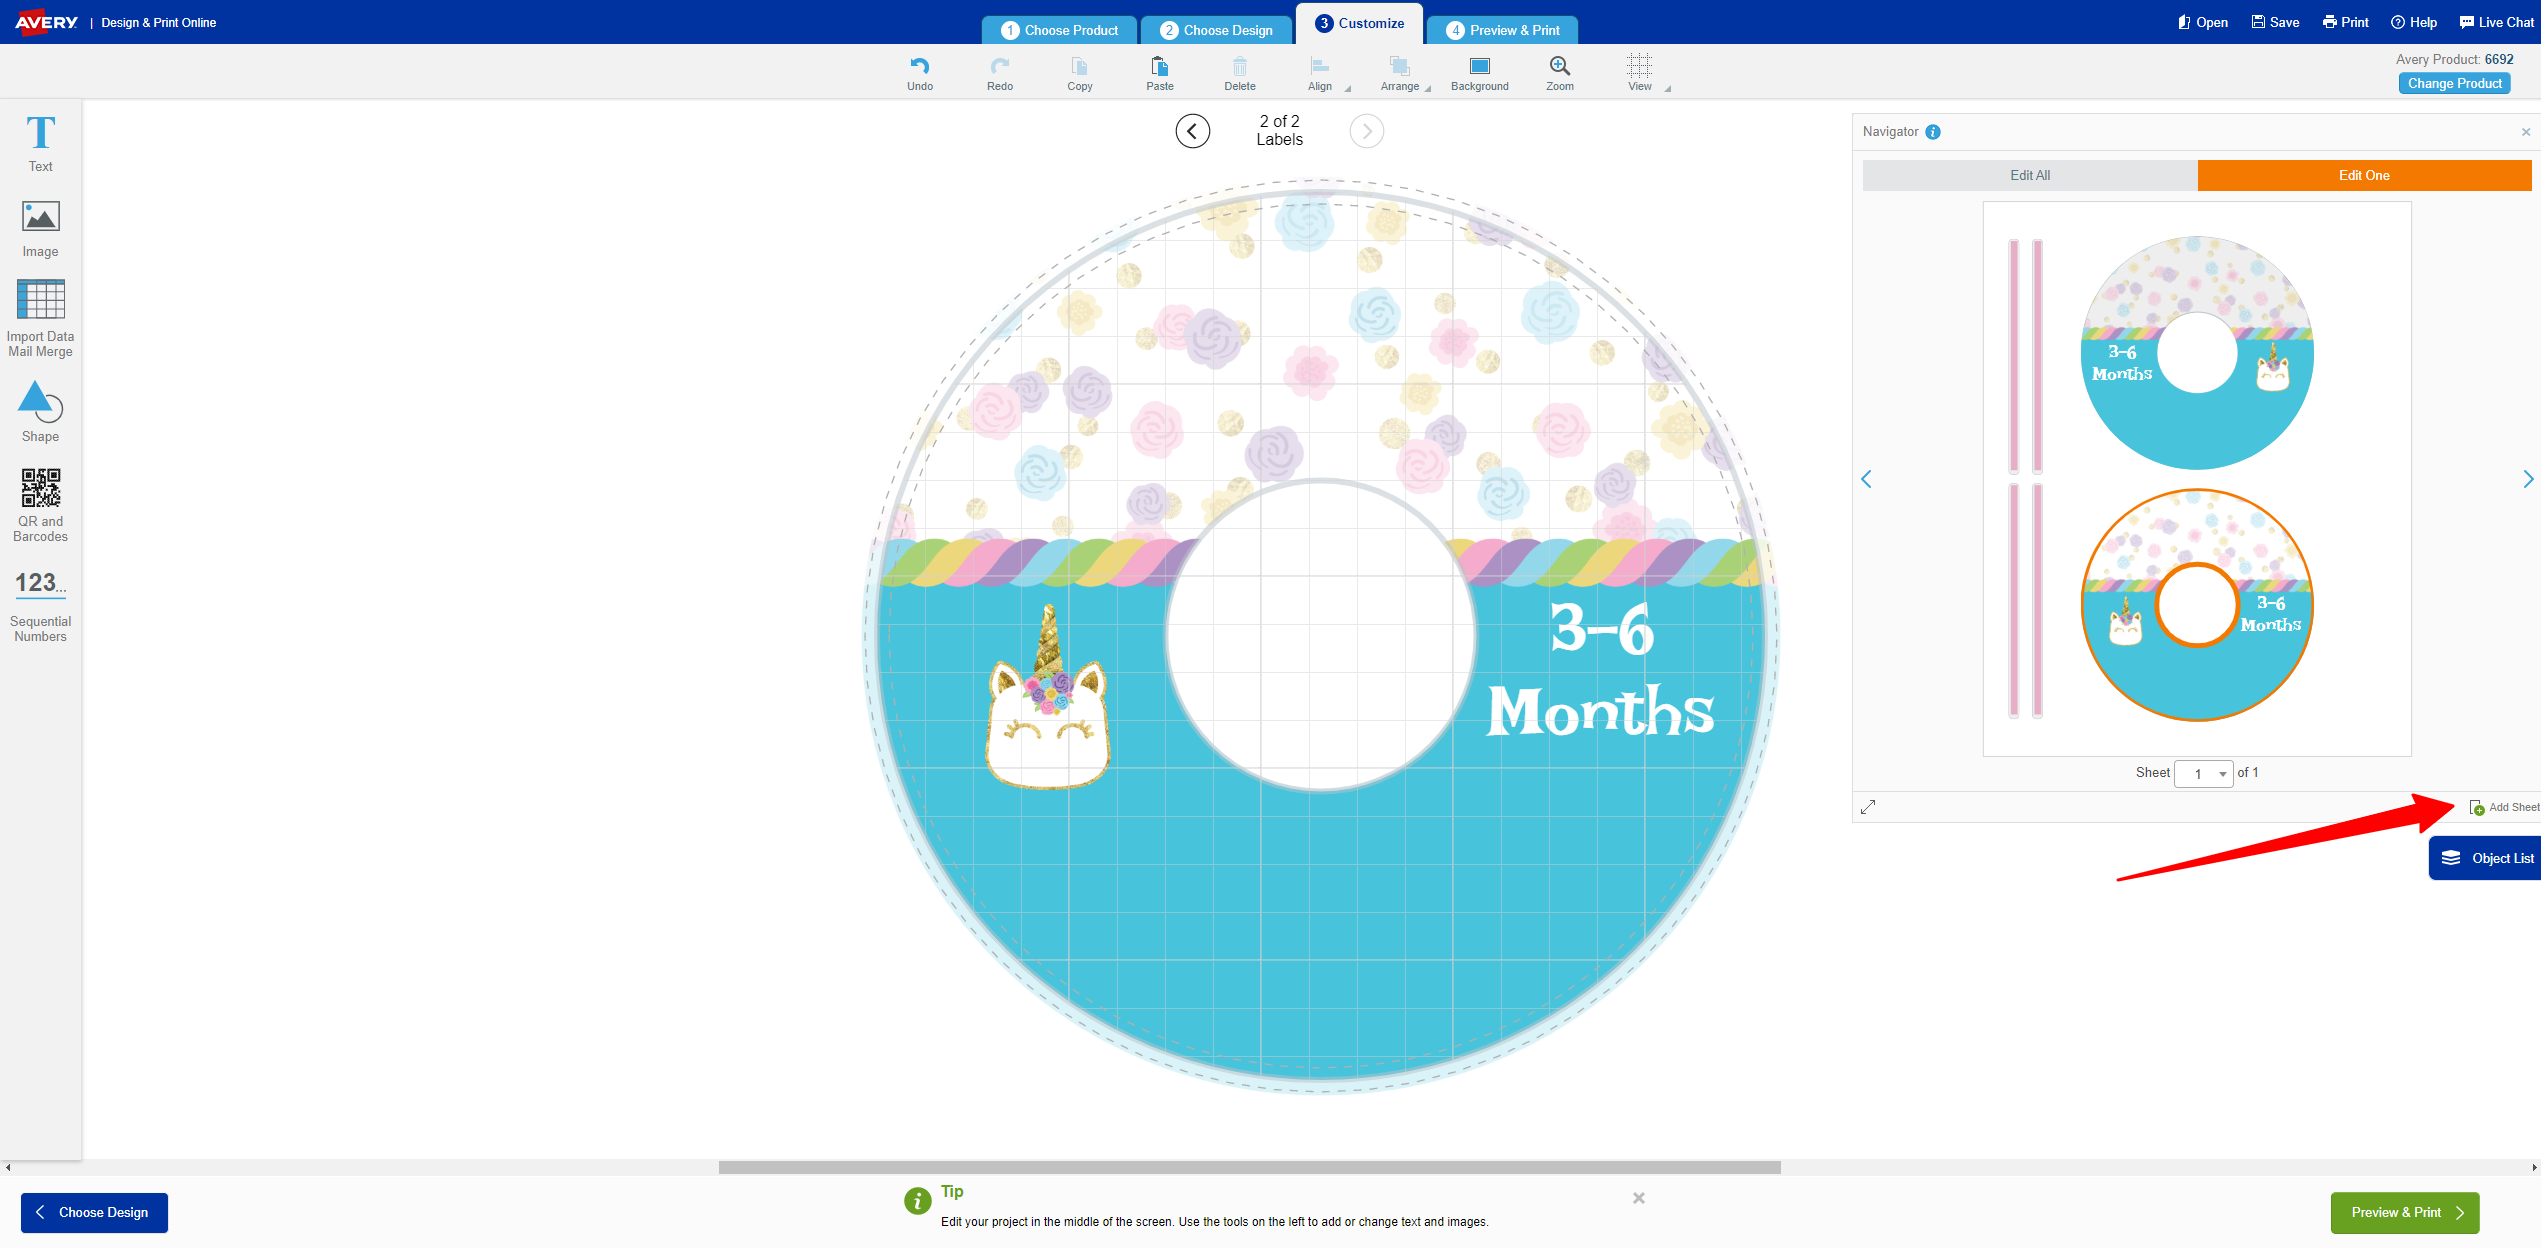 6. To create multiple sheets of labels, select Add Sheets from the same box you used to edit the individual labels. Then continue customizing additional sheets until you have enough front and back labels to create your desired number of closet dividers.
7. When you’ve finished designing your labels, follow the prompts on the screen to print them out.
8. Next, apply the front and back labels to each cardboard circle.
9. Then, once again using your craft knife, cut out the circles of cardboard visible at the centre of the circle.
10. Lastly, cut a straight line through the bottom of each divider, into the centre. This will enable you to hang your dividers on the closet rod.
If you make these Upcycled Cereal Box Closet Dividers, be sure to share the finished results with us on social media using hashtag #MadeWithAveryCanada!
Get inspired! Let Avery.ca help you create, organize, plan, and get down to business with innovative ideas, hundreds of free templates, a wide selection of products and high-quality printing services.
6. To create multiple sheets of labels, select Add Sheets from the same box you used to edit the individual labels. Then continue customizing additional sheets until you have enough front and back labels to create your desired number of closet dividers.
7. When you’ve finished designing your labels, follow the prompts on the screen to print them out.
8. Next, apply the front and back labels to each cardboard circle.
9. Then, once again using your craft knife, cut out the circles of cardboard visible at the centre of the circle.
10. Lastly, cut a straight line through the bottom of each divider, into the centre. This will enable you to hang your dividers on the closet rod.
If you make these Upcycled Cereal Box Closet Dividers, be sure to share the finished results with us on social media using hashtag #MadeWithAveryCanada!
Get inspired! Let Avery.ca help you create, organize, plan, and get down to business with innovative ideas, hundreds of free templates, a wide selection of products and high-quality printing services.
Upcycle your family’s cereal boxes while also organizing their closets, with this fun and easy DIY closet divider project. All you need are empty cereal boxes, a pack of Avery CD Labels and some basic crafting tools.
Looking for DIY baby shower gift ideas? Not only is the project great for separating seasonal clothes in your own closet, but you can make them into charming baby closet dividers. Baby closet dividers are a wonderful gift to present to new or expecting parent, since they almost always receive baby clothes in a variety of sizes!
What You’ll Need:
How to DIY Baby Closet Dividers:
Ensure that the top and bottom flaps of your cereal boxes have been opened. Then, using your craft knife, carefully cut through one of the boxes side seams and then lay the whole box flat on of your cutting map.
1. With the blank side of your box facing up, use your old CD as a pattern and trace as many circles onto the cardboard as possible.
2. Using your craft knife, cut out each circle and set aside.
3. Go to the CD Labels page on Avery.ca and browse our library of CD label designs. If you’re making baby closet dividers, take a look through our Baby Celebrations templates! You can also upload your own design or create something from scratch using our blank template.
4. Once you’ve selected your desired template, it’s time to personalize each label with sizes, seasons, or whichever method you plan to use to divide your closet. Each sheet of two labels creates one double sided closet divider. To make the front and back designs identical, you’ll want to create a mirror image of one.
5. To add different text to each label, select Edit One from the box on the right side of your screen. Then, click the label that you’d like to edit. When you’re finished, click on the other label on the sheet.
6. To create multiple sheets of labels, select Add Sheets from the same box you used to edit the individual labels. Then continue customizing additional sheets until you have enough front and back labels to create your desired number of closet dividers.
7. When you’ve finished designing your labels, follow the prompts on the screen to print them out.
8. Next, apply the front and back labels to each cardboard circle.
9. Then, once again using your craft knife, cut out the circles of cardboard visible at the centre of the circle.
10. Lastly, cut a straight line through the bottom of each divider, into the centre. This will enable you to hang your dividers on the closet rod.
If you make these Upcycled Cereal Box Closet Dividers, be sure to share the finished results with us on social media using hashtag #MadeWithAveryCanada!
Get inspired! Let Avery.ca help you create, organize, plan, and get down to business with innovative ideas, hundreds of free templates, a wide selection of products and high-quality printing services. 

Validate your login