Discover the most efficient way to add QR codes to your labels and cards using our FREE Design & Print Online tool!

QR codes are an essential part of business communications. They provide customers with a quick and easy way to gain access to additional product information, recipes, promotions and much more.
When you use the FREE Design & Print Online tool here at avery.ca you will discover that there are three different ways to add Barcode and QR codes to labels, cards, and even printable craft products.
In today’s blog we are going to walk you through Manual QR Code Data Input and QR Code Data Input from a Spreadsheet.
Manual Input

This is the most straightforward way to add the data for a single QR code. Use this method when you don’t need different information for a series of codes. Here is how to do it:
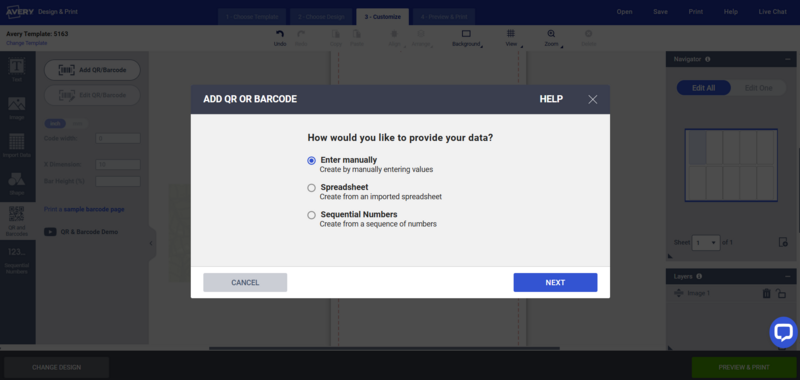
- Once you’ve opened up your template in the Design & Print Online tool select the QR and Barcodes button on the blue toolbar to the left of your screen.
- Next, select the Add QR/Barcode button to create a new code, or the Edit QR/Barcode button to edit an existing code.
- Choose the Enter manually option and click Next
- Under the Industry Standard Format option, click the arrow and scroll down to choose the option for QRCode.
- Next, select your code type. A QR code can point to a website, and email address, phone number, or text. MeCard and Vcard options are also available.
- Once you’ve selected your Code Type, enter the corresponding contact information to the field and select finish!
Note: Once your QR code has been created you can resize it and move it around to your desired placement.
Spreadsheet Upload

This method is ideal when you need to create a series of different codes. You can save time by uploading an existing spreadsheet or you can create a new sheet for upload. Here is how to do it:
- Just as before, we’ll start with an open template in the Design & Print Online tool and select the QR and Barcode button on the blue tool bar to the left.
- After you click the Add QR/Barcode button, select Spreadsheet from the options and press Next.
- Now it’s time to add your spreadsheet data. You can upload from your computer, select an existing spreadsheet from your Avery Account files, or add a spreadsheet from your Google Drive. Select Browse for File to upload.
- As instructed on the screen, select all columns and rows containing the URLs, emails, or other data that you went fed into your QR codes. Note: be sure to deselect any rows containing header information.
- On the next screen, select QRCode from the Industry Standard Format dropdown menu.
- You will now be presented with two columns. On the left you will see your data. On the right, select your code type from the menu. This is where you select whether your codes will lead to URLS, email address, etc.
- Drag and drop your data to the corresponding field on the right and click Finish.
- Your spreadsheet information will populate several different QR codes (one on each label). Use your phone or QR code scanner to view the different code destinations.
- You can now adjust the size and position of your codes as desired.
Using Your QR Codes

QR codes are a simple, effective way to connect with customers and clients! They make it easy to provide lots of information in a small space, such as on a label or card. Put QR codes to work for your small business today, directing customers to contact information, menus, websites, online reviews sites, appointment widgets, and more!


Validate your login