Designing and creating standout labels is one of the most important aspects of branding a new candle business. With candle making remaining one of the most popular small business ventures for entrepreneurial Canadians, it’s important that your candle line’s labels standout in a very crowded marketplace.
Today, we’re looking at some of the details you need to consider when creating new labels that will shine a light on your fabulous new product line.
Choose Your Main Attraction
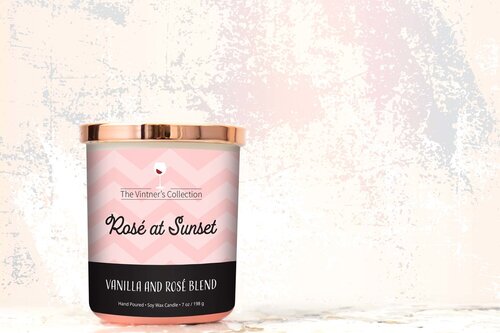
The most important aspect of creating your candle labels is deciding what role the label will play in the branding. Is the label going to be the star of the show or will it be a supporting player? Should the label be what catches a potential customer’s eye, or should is allow the candle itself to take on that role? Figuring this out will not only play into the label design, but into your choice of label materials. For example, a clear label might be used to let the candle itself take center stage, while the unique textures of a hemp label may be chosen to communicate a candle’s natural elements.
For Candle Jars and More
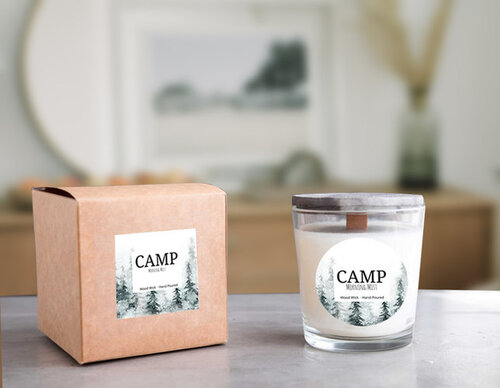
In addition to the candle jar itself, candle boxes and lids are also prime real estate for branded labels. Additional items like candle boxes, lids, accessories and shopping bags are great spots for labels as well.
When branding different shapes, such as square boxes vs cylindrical jars, you may want to work with different labels shapes and sizes, such as a square label on a candle box, a rectangle label to wrap the jar and a round candle label for a jar lid.
Candle Safety Labels
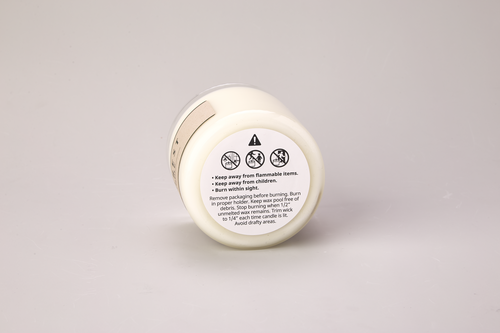
According to the federal government, candles have played a significant role in causing house fires over the years (Canada.ca), which is why it’s important to add safety labelling to the bottom of your candles and candle jars/containers. Avery has two candle safety templates available through our Design & Print tool, which can be applied to our new 2” Glossy White Round Soap and Candle Label or other label products.
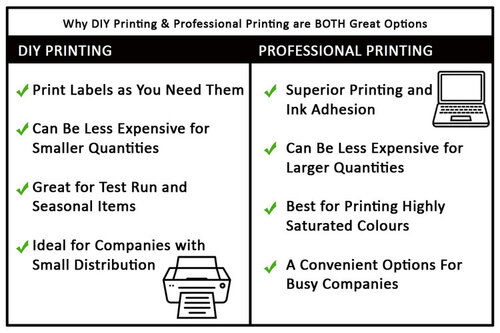
DIY or Professional Printing?
Once you’ve settled on what you want your labels to look like, it’s time to think about how you’d like them printed. Will you print them yourself, or should you opt for professional printing? There are plenty of reasons why either may be the right choice, but here are just a few for your consideration:
Practice Applying your Labels
Avery.ca offers innovative products to make life easier—at work, home, school, and small business. Shop our wide variety of products now, or get inspired with our blog and design gallery full of ideas for your next project.
Once you’ve designed your labels, selected your label material, and either printed your labels or ordered professionally printed labels it’s time for label application. While this may just seem like a case of sticking them on, the truth is that you’ll want to practice your application technique a bit to ensure a properly applied labels that goes on straight without bubbles or creases.
Here are the steps to applying neat, properly aligned labels:
- Pour and set and completely cool candles prior to applying the label. This ensure that you won’t get any overspill on the label
- Clean your candle tin or jar using alcohol and a lint-free cloth for the strongest adhesion
- Stabilize and align your jars/tins using two towels, an egg carton or cardboard box
- To apply, carefully peel the label from the liner and hold it by the outer edges *Note: If applying clear labels, it’s best to wear lint free gloves to avoid contamination from fingerprints.
- When applying a candle label to cylindrical surfaces like tins and jars begin by applying pressure at the middle of the label and move outward to prevent creases. If applying to a flat surface, like a box, start with an edge and roll the label onto the surface.
- To remove wrinkles and bubbles use a flat, firm tool like a credit card to gently push bubbles and wrinkles to the edge of the label.
- It’s important to let your labels cure at room temperature for 24 – 48 hours following application to prevent bubbles or wrinkles.
- If bubbles do appear, carefully poke a hole in the bubble with a small pin and gently push the air out using your flat tool.
Beyond the Label
Don’t forget to add branded cards and tags to your marketing mix. Use professionally printed postcards to communicate your candle business’ grand opening, any specials, or to use as thank you cards in your shipments. Business cards are great for networking and much more, while our selection of tags with strings can be used for everything from pricing to gifting and much more!
For more news, tips, and information about upcoming promotions, be sure to follow Avery Products Canada on Facebook, Instagram, and Pinterest or sign up for our newsletter (see below)!

Validate your login